Sunday, May 31, 2015

DIY Thrift Store Planter Ideas

Hello all!
My mom came for a visit this week so we hit a few local Goodwill stores to "shit shop" as we like to say (just because you don't need it doesn't mean you shouldn't get it sometimes!). While we were out we came across a ton of fun glassware that I wanted to share with you. I decided to buy an eclectic mix of new and old glassware to create a sort of "microgarden" for my dining room windowsill and I am absolutely in love with how it turned out!

(I am not sure exactly what he is supposed to be but I love him!)

We ended up finding some different milk and creamer carafes:

   
(These were marked with green 99 cent stickers, green was half-off so each one only cost 50 cents!)

A vintage sugar bowl and contemporary bakeware from William-Sonoma:

(This ironstone is by Salem China Co, Olde Staffordshire in the pattern English Village- $2.99)
(This is much newer from William-Sonoma but I loved the shape and gloss of the ceramic!- $1.99)

Finally there were the emotional and less rational purchases...

(I love everything pineapple so this printed canister was another steal (green 99 cent label= 50 cents). I wish I had more carefully removed the tape because I lost a piece of leaf in the process-*hint to Goodwill* don't cover the graphics in packing tape!)

(Chinese(?) tea glasses. They were cats, these were not intended to be planters but were too cute to pass up! My mom bought them for us at a heft $1.99 each!)

(Our new duck friend. I don't know that he is vintage but the ceramic has a beautiful wear to it and the face has an endearing look in the eyes, he was also a 99 cent green label so for 50 cents he got a new home. This turned out to be what Husby loved best from the haul #healwayskeepmeguessing)

Since these items are intended to be decorative I did not run them through the dishwasher but rather filled the sink with warm soapy water then washed them down with the soft side of the sponge:

::sidenote:: 
(Duck was not a good swimmer)


Then I set them out to air dry!
You can use these types of containers for a bunch of purchases, a salt dish, makeup brush holder, jewelry holder, and in my case, as a planter!

Because I did not want to drill holes in the bottom, I added a layer of gravel rocks to the bottom of each to keep the soil from getting too muddy when they are inevitably over-watered.

I picked up various plants from Home Depot and Produce Junction. The cashier at HD told me that the plants come with a one year guarantee so I am definitely saving my receipt in case any of the plants fail to thrive in their new home. I purchased a succulent (penguin) and some tall bamboo-like grass during that trip, each item was about 4 dollars, however I was able to split the grass up between two containers (pineapple and plain glass creamer).

I was pretty disappointed at the PJ selection today, but I was also in a rush to just get this together so I bought what they had. I got a container of little white flowers (white creamer with maroon stripe), an african violet plant (William-Sonoma), and some other greenery that came in a black mug (greenery planted in the vintage sugar bowl; the black mug actually was perfect for a sprout from another plant I had, so he makes an appearance in the final photos). My total for the three plants at PJ was $5.25!
(I love the look of this grass- I figured things without flowers would last longest!)

Husby and I are pleasantly surprised with the result and look forward to collecting more fun containers to fill up the rest of the windowsill. See the final pictures below =]

::sidenote:: 
(I can't wait for maintenance to finish the trim on our new windows, these holes are killing me!)

(The panda planter has chia seeds that I am hoping will grow. He is an old silly gift from my mom.)

(I think Duck is much happier in his new home!)

Finally a view from the table:

I think live plants bring a great warmth to any home. I don't have a green thumb yet but I am working on it. Next time you're thrifting be sure to imagine all the other uses the items you come across might have!

Until next time,


Monday, May 4, 2015

Bistro Table Makeover

I just wanted to share this super quick makeover of a bistro set that I found while out shopping with my mom this weekend. Unfortunately I was so eager to get started I didn't get a great before shot but here it is:

This was just a basic bistro set in green. 
The design is a bit more ornate than I usually see; with a nice flower detail and many curvy edges =]

We found it in the trash outside a house after hitting up the garden center. It was in great shape with the exception of a few areas of rust. Husby sanded those areas down for me! We used both steel wool and a palm sander to get the area smooth. The set also needed a good wipe down...
Prep work is usually Brian's job!

I had picked up some navy blue cushions with rope detail, but when we went to Lowe's for paint we decided to go in a different direction...
This is Valspar in Exotic Sea! A great big step from navy blue!


Several coats were required to get an even finish from the green. We used three cans for this project.

And here is the finished product!

I was tempted to put the set in the grass area behind out patio, but ended up putting it in a small rock bed near our grill. There might be some patio rearrangement in the future anyway. =]


Thanks for stopping by! I love these quick and easy makeovers,


Thursday, April 30, 2015

Custom Disney T-Shirts

As has been said before, I love Disney. I did the Disney College Program and was completely consumed with our trip. As a result, husby and I had coordinating outfits for each day of our vacation! Below are some photos and descriptions of our custom t-shirts for the trip!

Our first day shirts were for Animal Kingdom. Appropriately I had a zebra print and Brian had a dinosaur print. What made these shirts special was that they glowed in the dark! We were able to score an unopened pack of glow in the dark iron-on transfers at the thrift store for $2 (if you can't tell we LOVE the thrift store!). You can make simple or more complex designs of your own. There are lots of Youtube videos and blog posts explaining how to use photoshop if you are not familiar. For my shirt we took a Mickey ear template and created two layers in photoshop. We removed the inner area of the ears to expose the zebra print below! Brian's shirt was more complex. We fooled around for a WHILE in photoshop to create a dinosaur-bone background print with an overlay of a T-rex peaking from the corner wearing some mouse ears:
Once our images were complete I ironed them onto some printable fabric paper that was white. These transfers were designed to be used on white fabric, as you can see our shirts were grey, so to remedy this, I ironed them onto a white fabric first. I then used heat n' bond to adhere the ears onto the shirts! We got great reactions from cast members and guests especially on Brian's shirt!

The next type of shirt I made used some Disney print fabric and the same heat n' bond. I didn't want the same prints available at the fabric store, so we scoured the thrift store for old Disney bed sheets. I found a great print of the Fab 5 sky diving, and a set of 101 Dalmatian sheets. To make these shirts I rough cut around the shapes, then ironed onto heat n' bond (double sided), then more precisely cut out the image before ironing onto the shirts. I also went a step further and did decorative stitching around the design but that is totally optional! 


Brian's favorite Disney movie is Aladdin, so I planned to buy some Aladdin sheets off of Ebay but held off with the hopes of finding it in the thrift store. Wouldn't you know I was able to get my hands on a flat sheet from the Aladdin bed set I was looking for!? $6 at Red, White and Blue was a huge savings on the $20 plus shipping Ebay was asking for! I made an amazing shirt for Brian, and embroidered the outside, unfortunately we ended up with more shirts than days in Disney and the shirt was never worn. It kind of broke my heart, but it still was fun to make!
                                         

I also made matching shirts for our whole family using fabric and double sided heat n' bond. I used the same mouse ear print to cut out solid black mouse ears for all the shirts. I made Minnie shirts for girls, and Mickey shirts for boys. For Minnie, I made a polka dot bow that was hand sewn on. For Mickey, I cut a half circle of red for his shorts and ironed that over the black, then hand sewed two yellow buttons onto the red shorts area. I also cut out our names using the Waltograph font  and an exacto knife. Please do yourself a favor and print any words mirror image before you do your project! This will save you from having to do things twice. When you are ironing the letters on, the letter will be flipped. So if you cut it out facing the "right" way, the letters will be wrong when flipped and ironed. I just used Microsoft word to reverse the images before printing. Then I traced the images onto the paper side of the heat n' bond before cutting out and ironing onto the shirts. Unfortunately this day was freezing (around 40 degrees: see the girl in the background in Uggs and a puffy jacket?); we were bundled up in multiple sweatshirts. Our shirts were only seen when we took them off for pictures. =[


I also designed some mouse ear shirts using some of our favorite characters. Mine was Mrs. Potts and Brian's was Bruce. You can make your own images using photoshop or you can buy images off sites like Etsy. For these I did not use an iron on paper. Instead, I used the same printable fabric sheets as with the Animal Kingdom shirts. I printed out my image onto the paper, then cut the images out. I then sealed the images using Scotch Guard water proof spray. A word from someone who learned the hard way: make sure your image is COMPLETELY dry before you spray it or the ink might run. If you have more patience than I do, I would recommend spraying after allowing the image to dry overnight. I then used more of the heat n' bond to secure the image to the shirt. This Bruce shirt was Brian's favorite of them all!


This pic was from the flight home, Brian was very sad to leave; I might have cried #noshame

I hope you enjoyed this post. I know this might seem a bit much for some people but I think it makes for wonderful memories and special attention from Disney's cast members!

Until next time, 

Disney on a Budget: Disney Thrifting


As a former cast member I simply love all things Disney, unfortunately, I do not have the budget to buy all the things I am going to want once I get to the park! This is a dilemma faced by many families, especially those with children. Many websites recommend pre-buying souvenirs for children to save some $$, and I figured the same should apply for us! However, instead of getting off Disney brand merch at places like Wal-mart, I was able to get authentic Disney merchandise at my local thrift store!

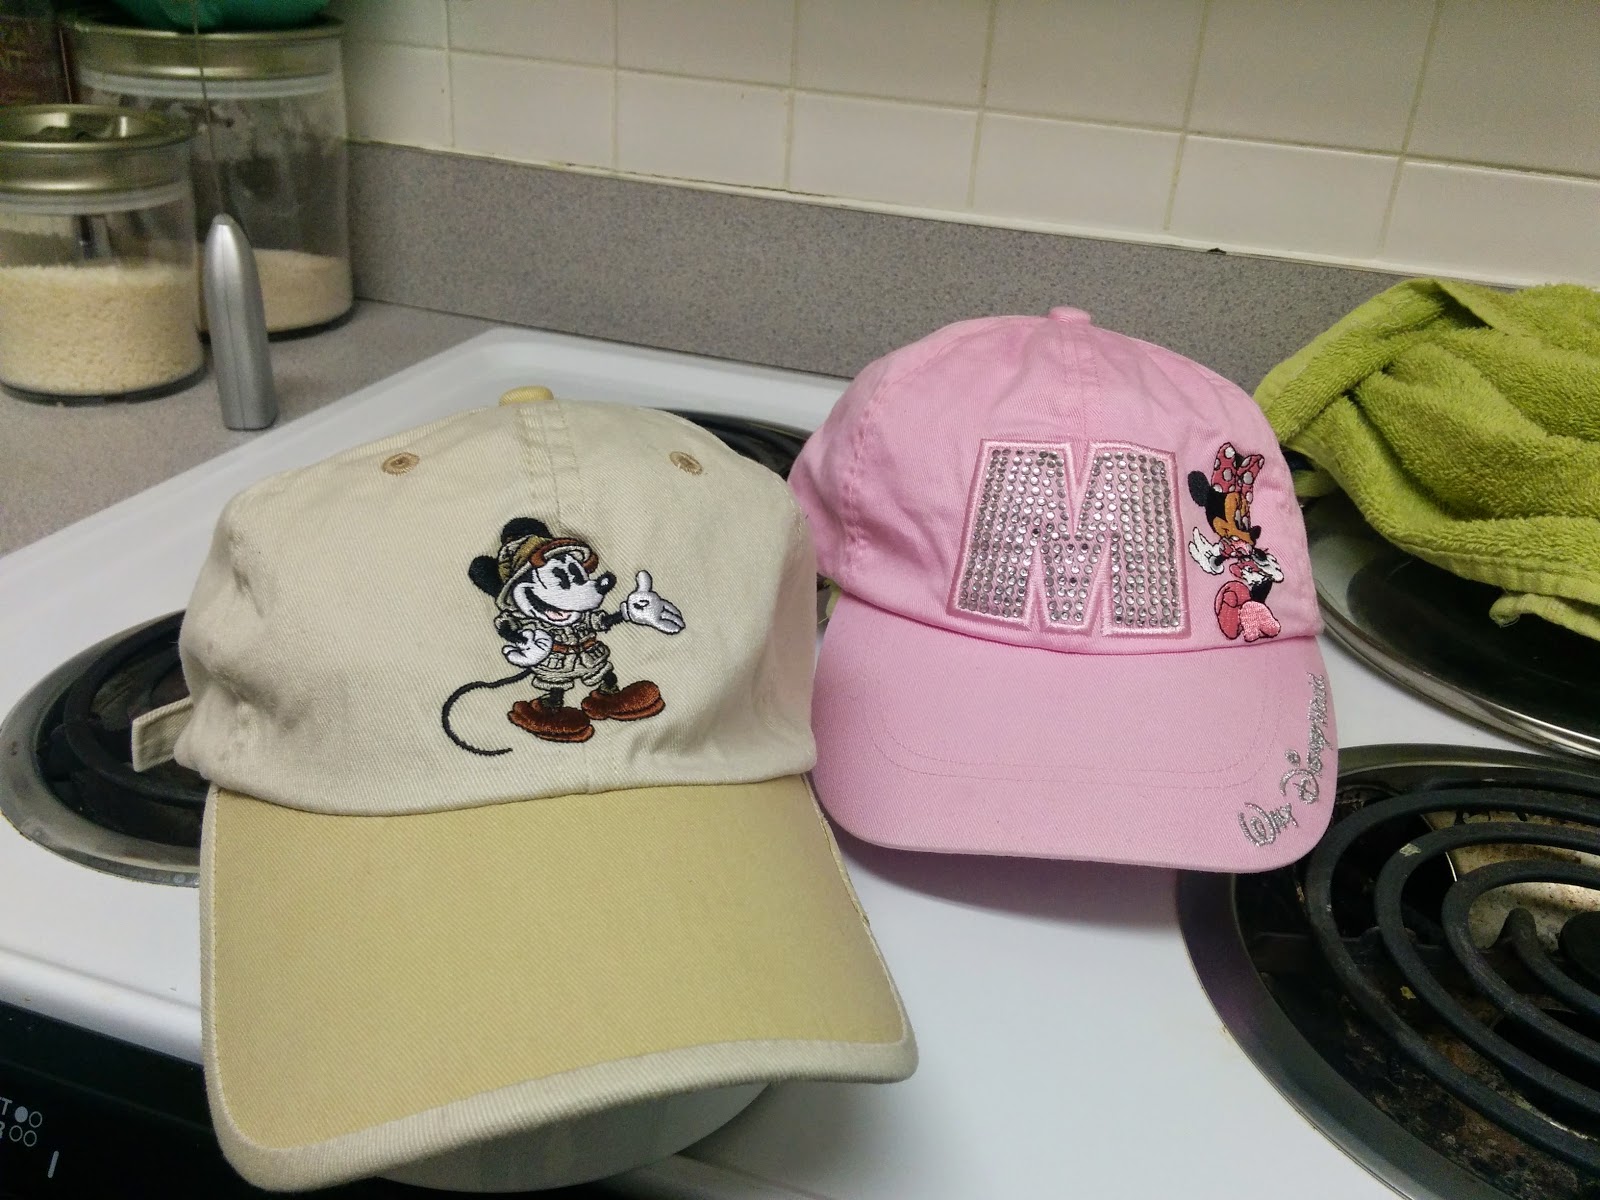
Every time we go to the thrift store I turn my Disney filter on and look for anything I might like to have on the trip. We found a brand new with tags embroidered polo from WDW ($10 at Red, White, and Blue), two matching draw-string back packs also from WDW ($2 each), and two ball caps also from WDW (safari Mickey $2, Minnie $1). A quick wash in hot water made these items look brand new. I love this as an idea to create fun anticipation before taking the trip, it adds a little excitement to have a hunt for treasure for the parks!
Pics below!


Rustic Headboard DIY


 The past few months have been so busy! I was finishing up my MBA and had my world turned upside-down by being selected as a juror on a month long criminal trial. Now that life has settled down, the trial is over and my diploma in hand, I have finally gotten these hands on some DIY projects!
(bare bones!)

Our bedroom has stayed largely untouched since we moved into our apartment. One thing we have tossed around to amp-up our bedroom style is to get a headboard. With a king size bed, a headboard comes at a hefty price. I have been diligent in keeping an eye out for one on Craigslist or the thrift store, but have come up blank.

This Sunday I woke up and was browsing Pinterest when I quickly became consumed with redesigning our bedroom that same day! We settled on a rustic wooden headboard and some new bedding to bring a nautical feel to the bedroom to match the rest of our home. This tutorial was the foundation for my design.

We started out by going to Home Depot for wood. Every post I had read said to use pine, but I found pine to be completely out of my price range. What we did find in the lumber section was some Douglas Fir, a quick Google search showed that it should respond well to stain, so we took the dive and got it! We got 6 boards for the headboard and two boards for the legs. The large boards were 8 ft long and 2 x 6 inch and rang in at $5.38 each. We also got two 2 x 4 inch boards for the legs which were about $2.50 each. We also picked up a can of Minwax stain in English Chestnut, and a  25 pack of 2 1/2 inch screws.

We wanted our headboard to be a bit bigger than the bed, so we had Home Depot cut the large boards to 7 feet and the two legs to 5 feet.
Once we got it home we sanded down the front of the wood that would make the face of the headboard. When picking out the boards, I went for whatever was cracked and knotty because I wanted the headboard to have character.

Once sanded it was time to stain. We have food safe gloves that we use when cooking, so I used those to keep my hands clean from the stain. (Side note: I knocked over the can of stain during the staining process which caused half the can to pour onto my arm and into the glove! You can only prepare so much!) I used an old sock to apply the stain by dipping the sock into the can and just rubbing it into the wood. Because the wood was fresh and took stain well I didn't need to brush it on and then wipe it off, I just simply wiped it on. A great tip I have learned from one of my favorite shows "Rehab Addict" is to pretreat your wood with water to help it soak in the stain. To do this, I used a wet paper towel to wipe down each board just before I stained it so that the wood was moist, but not wet.
This was the wood just after staining. I stained the front, both ends, and the sides of all the boards. Even if you feel the legs of the headboard might not show it is a good idea to stain them. The large boards will have spaces in between which will show through to the legs, and on our bed the legs did show on the edge of the bed. After staining we put on a coat of polyurethane and let the boards dry overnight. You can poly inside but it absolutely stinks and will make you house smell a lot longer than you might like it to!
We were finally ready to assemble, and this is where our project took a turn for the worst (#obstacles). I am not sure whether we had an uncharged drill or a weak drill, but we could barely drill pilot holes in our wood, and were completely unable to screw the boards together. We ended up renting an impact driver from Home Depot for $15 for four hours. That was the best $15 we spent because after we had working tools the project came together FAST.
I lined up my 6 boards the way I wanted them to look, and then flipped the boards over long ways to maintain the direction of the boards. For each board we used 4 screws, two into each leg for a total of 24 screws. We measured the distance of the edges of our bed frame (74 inches) in case we later decided to try and attach the headboard to the frame. At this time it is standing behind our bed just fine without being secured. Since this is not our permanent home and we have a lot of storage under our bed, it didn't make sense for us to attach it to the frame because the bed is moved fairly often.
Once you have this distance you will calculate where to position your legs. I drew a diagram to help myself understand where to place the legs on the boards:
Take the length of the headboard (84 inches) and the distance between your frame ends (74 inches). The difference between the two measurements is 10 inches. This is how much extra space you have TOTAL, but we need to divide that space to be on each side of the legs so we divide that number in half. This gives us 5 inches in from either side. This point needs to be in the middle of our legs. Since our legs are 4 inches wide, we want to find that midpoint. Again divide that in half and get 2. From this point we know that from the midpoint of the boards will be two inches towards the edge, which means that the edge of the board should be 3 inches from the edge. This 2 inches of leg, and 3 inches of headboard add up to be that 5 inch edge space we needed in the beginning. I STRONGLY recommend you draw out your image to help visualize what you will need to do! 

For the legs, you would adjust the height according to your own bed. Our bed was about 2 1/2 feet tall, so we put our legs 2 inches from the top of the headboard, and three inches from each side as we calculated just now. I marked around the whole leg with a pen to make sure the leg was in the right place. We went down each leg with two screws per board and we were done!


 This smile says it all! We were able to overcome the hurdles and built this headboard for under $60. Below is a picture of the headboard and leg without the bed:

Here you can see that the headboard is just standing on its legs against the wall. We also painted our wall in Behr's Sterling paint. It is a wonderful light grey color which worked perfectly in our bedroom which doesn't get a ton of light. It is important to account for the lighting when picking any color paint or stain. As you can see, the headboard color is completely different in the shadows of our bedroom.
With that here is our finished product. I think this design balances nautical, feminine, and masculine aesthetics. I try to be sensitive to the fact that a man lives in this home too!

Thanks for stopping by!